Introduction
Electrical safety is paramount in any home, and one critical component that contributes to this safety is the Ground Fault Circuit Interrupter (GFCI) outlet. These specialized outlets are designed to prevent electrical shocks by interrupting the flow of electricity if a ground fault is detected. Today, we’re going to walk through the installation process of a GFCI outlet. For your convenience, I’ve included Amazon Affiliate links for high-quality products that you’ll need for this task.
What is a GFCI?
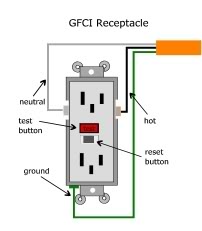
A ground-fault circuit interrupter, or GFCI, is a device used in electrical wiring to disconnect a circuit when unbalanced current is detected between an energized conductor and a neutral return conductor. Such an imbalance is sometimes caused by current “leaking” through a person who is simultaneously in contact with a ground and an energized part of the circuit, which could result in lethal shock. 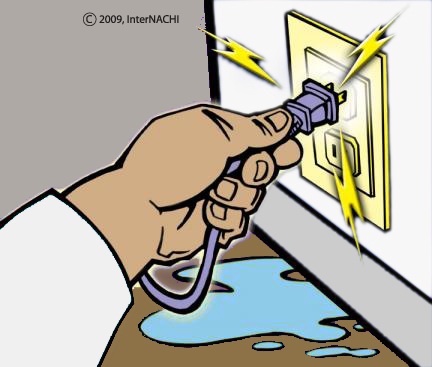 GFCIs are designed to provide protection in such a situation, unlike standard circuit breakers, which guard against overloads, short circuits and ground faults.
It is estimated that about 300 deaths by electrocution occur every year, so the use of GFCIs has been adopted in new construction, and recommended as an upgrade in older construction, in order to mitigate the possibility of injury or fatality from electric shock.
History
The first high-sensitivity system for detecting current leaking to ground was developed by Henri Rubin in 1955 for use in South African mines. This cold-cathode system had a tripping sensitivity of 250 mA (milliamperes), and was soon followed by an upgraded design that allowed for adjustable trip-sensitivity from 12.5 to 17.5 mA. The extremely rapid tripping after earth leakage-detection caused the circuit to de-energize before electric shock could drive a person’s heart into ventricular fibrillation, which is usually the specific cause of death attributed to electric shock.
Charles Dalziel first developed a transistorized version of the ground-fault circuit interrupter in 1961. Through the 1970s, most GFCIs were of the circuit-breaker type. This version of the GFCI was prone to frequent false trips due to poor alternating-current characteristics of 120-volt insulations. Especially in circuits with long cable runs, current leaking along the conductors’ insulation could be high enough that breakers tended to trip at the slightest imbalance.
Since the early 1980s, ground-fault circuit interrupters have been built into outlet receptacles, and advances in design in both receptacle and breaker types have improved reliability while reducing instances of “false trips,” known as nuisance-tripping.
Step 1: Gather the Necessary Tools and Materials
Before you begin, it’s essential to have the right tools and materials ready. Here’s what you’ll need:
Ensure you have all these items on hand, or click the links to order them from Amazon.
Step 2: Turn off the Power
Safety first. Locate your home’s electrical panel and turn off the breaker connected to the outlet you are replacing. Use a voltage tester to make sure there is no power flowing to the outlet.
Step 3: Remove the Old Outlet
Once the power is off, remove the outlet cover, then unscrew the outlet from the electrical box and gently pull it out. Disconnect the wires from the terminal screws of the old outlet.
Step 4: Prepare the Wiring
Inspect the wires for any damage. If necessary, use wire strippers to cut and strip the wire insulation to expose fresh wire for a secure connection.
Step 5: Connect the GFCI Outlet
Identify the “line” and “load” terminals on the new GFCI outlet. Connect the black (hot) wire to the brass “line” terminal and the white (neutral) wire to the silver “line” terminal. If there are ground wires, connect them to the green grounding screw.
Step 6: Install the GFCI Outlet
Carefully push the wired GFCI outlet back into the electrical box, making sure the wires are neatly folded and not pinched. Screw the outlet to secure it in place.
Step 7: Test and Restore Power
Replace the outlet cover, then turn the power back on at the breaker. Press the “test” button on the GFCI outlet to trip it, and the “reset” button to restore power.
Conclusion
Installing a GFCI outlet is an effective way to enhance the safety of your home. By following the steps outlined in this guide, you can perform the installation with confidence. Remember, GFCI outlets and all the tools you need can be found through the Amazon Affiliate links provided.
Stay safe and happy DIY-ing!